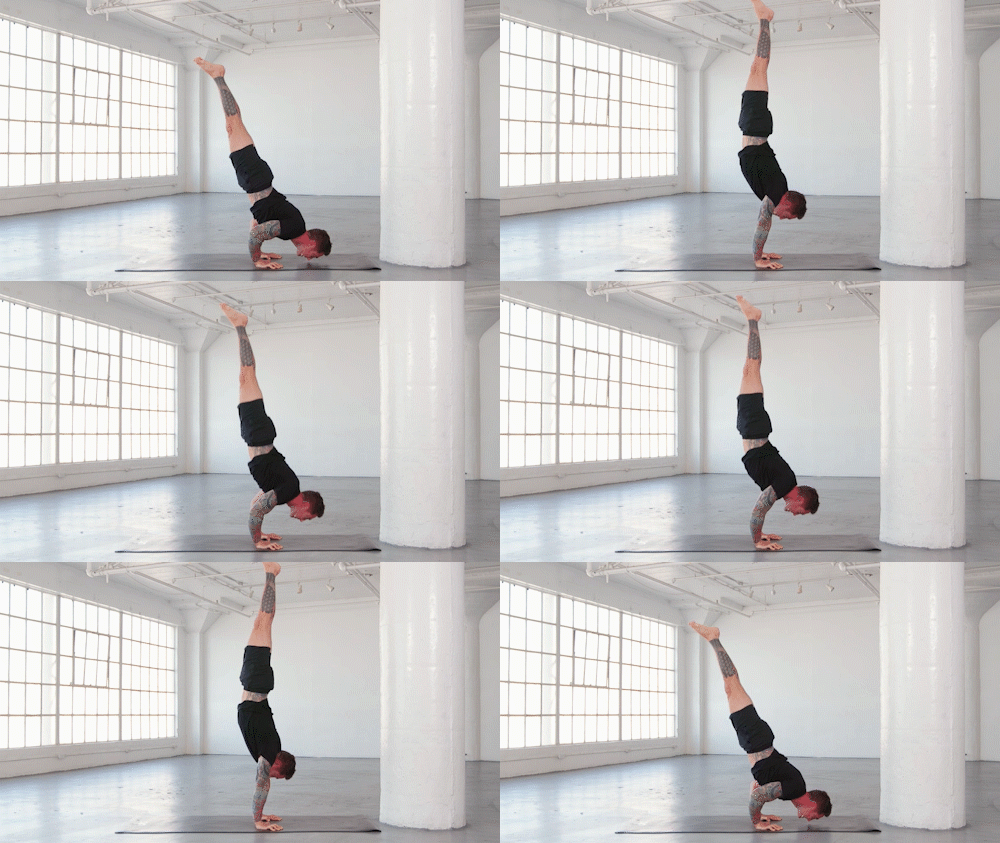
How to Do Handstand Push-Ups
The Handstand Push-Up is a challenging move for deepening an advanced inversion practice. Adding this extra layer to your handstands can build even more strength — plus, it looks really cool. Learn how to do Handstand Push-Ups with this step-by-step tutorial from Alo Moves instructor Dylan Werner.
1.
Get your shoulders and wrists ready.
Don’t skip this step! It’s important to warm up thoroughly with stretches and targeted movements before jumping in — it keeps you safer and builds better long-term balance. Try Dylan’s 10-minute Shoulder & Wrist Mobility class for inspiration. You might try going through some of your favorite inversions a few times, too.
“When the shoulders are open, it’s a lot easier to hold the line,” says Dylan. “Plus having nice warm shoulders always helps.”
(If you need some more work on your handstands before embarking on this particular journey, try Dylan’s FlyStrong series — or his School of Arm Balance series for an arm-balancing primer.)
2.
Pop up into your handstand.
To maintain a solid, straight handstand, tuck your ribs and draw your belly up. This will create a posterior tilt to your pelvis, taking some of the pressure off your hips. Stay strong through your glutes, and keep your hands relatively close together, about underneath your hips. This sets you up for a strong push from your traps.
“It’s important to have all the muscles well-rounded so they’re all supporting each other and working together as a team,” explains Dylan.
If you have your handstands down but you’re not quite ready to do your Handstand Push-Ups unsupported, put on a pair of socks and kick up to the wall with your body a foot and a half away from it. If you touch your hand to the wall with your elbow at a 45-degree angle, it should give you a rough estimate of where you need to place your hands on the ground.
3.
Bend your arms and shift forward.
It’s important to keep your center of gravity above your hands, so don’t just come straight down. A shift forward will help support your shoulders and lower chest.
“It’s a little bit different than CrossFit, where it’s a military press overhead,” explains Dylan. “Shifting forward brings the shoulders in front of the wrists and allows the body to kind of cantilever so we’re able to keep the balance.”
4.
Touch your nose to the mat.
To complete your Handstand Push-Up, you should be able to touch the tip of your nose to the mat. Don’t give up if you can’t, though — coming down as much as you can still makes a great practice drill as you work up to the full exercise.
5.
Push and straighten back up.
Congratulations, you’ve completed your first Handstand Push-Up! Next step: Can you do a set of 10?
If you want more detailed instructions for doing Handstand Push-Ups, Dylan Werner will guide you through every step of the way — including more advanced warm-up drills — in his Daily 10s series. Start your 14-day free trial to get moving.


